Laravel – Yajra Datatable Operations
In this article, I would like to talk about the yajra/laravel” datatables library that provides us a lot of conveniences when creating a table. With this library, we get rid of complex database queries, paging operations, and the hassle of searching through data.
First of all, if you have not done it before and you are complaining about the slow work of the composer, let’s start by switching to the composer 2.0 version. Let’s run the code below from your terminal screen.
#/bin/bash
_> composer self-update
Let’s continue our project by adding the library. For this project, I will be using Laravel 8.x version. But the library has been fully supported since Laravel 4.2. Let’s start!
composer require yajra/laravel-datatables:^1.5
We are adding our library to our project.
* Note: You can use Html, button, etc. on the project. I installed all the packages as I will explain in the add-ons. The PHP ext-zip extension is required for this setup. You can use the kernel version if you wish.
composer require yajra/laravel-datatables-oracle:"~9.0"
Let’s make our service link.
# config/app.php'providers' => [
    // ...
     YajraDataTablesDataTablesServiceProvider::class,
     YajraDataTablesHtmlServiceProvider::class,
     YajraDataTablesButtonsServiceProvider::class,
     YajraDataTablesEditorServiceProvider::class,],
To transfer the settings and files, we need to publish.
php artisan vendor:publish --tag=datatables
php artisan vendor:publish --tag=datatables-buttons
Now we can start using our library.
Before I start using the library, I’ll be using the “factory design pattern” to manage dependencies more easily. You can have more detailed information about the subject by researching design patterns beforehand. First, let’s create our folders. It should look like this
|_ App
|__ Example
|--- Business
|---- Abstraction
|---- Concrete
|--- DataAccess
|---- Abstraction
|---- Concrete
Instead of Example, you can make a name by yourself. As an example, we will make a Customers list. First of all, we create a model, migration, factory, and seeder for demo content.
php artisan make:model Customers -mcsf-m : migration
-c : controller
-s : seeder
-f : factory
Migration file
Schema::create('customers', function (Blueprint $table) {
    $table->id();
    $table->string('name');
    $table->string('email');
    $table->string('phone');
    $table->string('slug')->unique();
    $table->text('address');
    $table->softDeletes();
    $table->timestamps();
});
Seeder file
# database/seeders/CustomersSeeder.php
 Customers::factory()->count(500 )->create();

# database/seeders/DatabaseSeeder.php
$this->call([
    CustomersSeeder::class
]);
Factory dosyası
$name = $this->faker->name;
return [
    'name'  => $name,
    'email' => $this->faker->unique()->safeEmail,
    'phone' => $this->faker->phoneNumber,
    'slug' => Str::slug( $name ),
    'address' =>  $this->faker->address
];
and then after entering database information on .env
php artisan migrate --seed || php artisan migrate:fresh --seed
By writing, we will add 500 demo customers to our database. Now we can do all the library related operations.
First, let’s create an ICustomersService file under “Business / Abstraction”, then create a file named CustomersManager under “Business / Concrete”.
Let’s edit the ICustomerService file as follows.
namespace AppExampleBusinessAbstraction;

interface ICustomersService
{
    public function listForDatatable();
}
Let’s organize the inside of the CustomerManager file as follows.
AppExampleBusinessConcrete;

use AppExampleBusinessAbstractionICustomersService;

class CustomersManager implements ICustomersService
{

    public function listForDatatable()
    {
        // TODO: Implement listForDatatable() method.
    }
}
Next, let’s create two files named ICustomersDataService and CustomersDataManager in the Data layer. Let’s arrange them as follows.
# CustomersDataService

AppExampleDataAccessAbstraction;

interface ICustomersDataService
{
    public function listForDatatable();
}

# CustomersDataManagerAppExampleDataAccessConcrete;

use AppExampleDataAccessAbstractionICustomersDataService;
class CustomersDataManager implements ICustomersDataService
{
    public function listForDatatable()
    {
        // TODO: Implement listForDatatable() method.
    }
}
Now let’s determine the route in which we list the customers.
# routes/web.php
Route::group(['prefix'=>'musteri'], static function(){
   Route::get('liste', 'CustomersController@list')
             ->name('get.customers.list');
});
We can now start adding on Yajra.
Usage: php artisan datatables:make Customers
Output: AppDataTablesCustomersDataTable
First of all, our file should look like this.
AppDataTables;

use AppModelsCustomer;
use YajraDataTablesHtmlButton;
use YajraDataTablesHtmlColumn;
use YajraDataTablesHtmlEditorEditor;
use YajraDataTablesHtmlEditorFields;
use YajraDataTablesServicesDataTable;

class CustomersDataTable extends DataTable
{
    /**
     * Build DataTable class.
     *
     * @param mixed $query Results from query() method.
     * @return YajraDataTablesDataTableAbstract
     */
    public function dataTable($query)
    {
        return datatables()
            ->eloquent($query)
            ->addColumn('action', 'customers.action');
    }

    /**
     * Get query source of dataTable.
     *
     * @param AppModelsCustomer $model
     * @return IlluminateDatabaseEloquentBuilder
     */
    public function query(Customer $model)
    {
        return $model->newQuery();
    }

    /**
     * Optional method if you want to use html builder.
     *
     * @return YajraDataTablesHtmlBuilder
     */
    public function html()
    {
        return $this->builder()
                    ->setTableId('customers-table')
                    ->columns($this->getColumns())
                    ->minifiedAjax()
                    ->dom('Bfrtip')
                    ->orderBy(1)
                    ->buttons(
                        Button::make('create'),
                        Button::make('export'),
                        Button::make('print'),
                        Button::make('reset'),
                        Button::make('reload')
                    );
    }

    /**
     * Get columns.
     *
     * @return array
     */
    protected function getColumns()
    {
        return [
            Column::computed('action')
                  ->exportable(false)
                  ->printable(false)
                  ->width(60)
                  ->addClass('text-center'),
            Column::make('id'),
            Column::make('add your columns'),
            Column::make('created_at'),
            Column::make('updated_at'),
        ];
    }

    /**
     * Get filename for export.
     *
     * @return string
     */
    protected function filename()
    {
        return 'Customers_' . date('YmdHis');
    }
}
I will summarize the connection with Ajax as I will do Server-Side Rendering. First of all, we will have to make some adjustments. We organize the file as follows.
AppDataTables;

use AppModelsCustomers;
use YajraDataTablesDataTableAbstract;
use YajraDataTablesHtmlBuilder;
use YajraDataTablesHtmlButton;
use YajraDataTablesHtmlColumn;
use YajraDataTablesServicesDataTable;

class CustomersDataTable extends DataTable
{
    /**
     * Build DataTable class.
     *
     * @param mixed $query Results from query() method.
     * @return IlluminateHttpJsonResponse
     */
    public function dataTable($query)
    {
        return datatables()
            ->eloquent($query)
            ->addColumn('action', static function (Customers $customer) {
                return "Detail";
            })
            ->toJson();
    }

    /**
     * Get query source of dataTable.
     *
     * @param Customers $model
     * @return IlluminateDatabaseEloquentBuilder
     */
    public function query(Customers $model)
    {
        return $model->newQuery();
    }

    /**
     * Optional method if you want to use html builder.
     *
     * @return Builder
     */
    public function html()
    {
        $columns = $this->getColumns();
        return $this->builder()
            ->setTableId('customers-table')
            ->columns($columns)
            ->language( "//cdn.datatables.net/plug-ins/1.10.21/i18n/English.json" )
            ->minifiedAjax()
            ->orderBy(0)
            ->buttons(
                Button::make('reset')
            )
            ->ajax([
                'url' => '/customers/list-datatable',
                "type" => 'POST',
            ]);
    }

    /**
     * Get columns.
     *
     * @return array
     */
    protected function getColumns()
    {
        return [
            Column::make('id')->title('ID'),
            Column::make('name')->title('Name'),
            Column::make('email')->title('E-Mail'),
            Column::make('phone')->title('Phone Number'),
            Column::make('address')->title('Address'),
            Column::make('action')->title('#'),

        ];
    }

    /**
     * Get filename for export.
     *
     * @return string
     */
    protected function filename()
    {
        return 'Customers_' . date('YmdHis');
    }
}
Let’s explain its content.
public function dataTable($query)
{
    return datatables()
        ->eloquent($query)
        ->addColumn('action',
                     static function (Customers $customer) {
            return "Detail";
        })
        ->toJson();
}
If we want to add a column in addition to our existing data, we add this section with addColumn. The first parameter is naming and the second parameter refers to the content of the data we will add to this column.
public function html()
{
    return $this->builder()
        ->setTableId('customers-table')
        ->columns( $this->getColumns() )
        ->language( "//cdn.datatables.net/plug-ins/1.10.21/i18n/English.json" )
        ->minifiedAjax()
        ->orderBy(0)
        ->buttons(
            Button::make('reset')
        )
        ->ajax([
            'url' => '/customers/list-datatable',
            "type" => 'POST',
            "headers" => [
                'X-CSRF-TOKEN'=> csrf_token()
            ]
        ]);
}
This is the part that forms the template of our table.
setTableId : Used to add an id in addition to our table.
columns    : Determines the columns of our table.
language   : Refers to the language of the table. (Default: English)
minifiedAjax :Removes unnecessary queries.
orderBy    : Refers to the sort type of the specified column.
buttons    :  Buttons to be added to the table (print, export, reset)
ajax.url   :  The URL to request
ajax.type  : Request type
ajax.header.x-csrf-token : The token required for our post request

*Also, you can pass the parameters valid for Ajax.
protected function getColumns()
{
    return [
        Column::make('id')->title('ID'),
        Column::make('name')->title('Name'),
        Column::make('email')->title('E-Mail'),
        Column::make('phone')->title('Phone Number'),
        Column::make('address')->title('Address'),
        Column::make('action')->title('#'),

    ];
}/**
 * Make :  It refers to the name of our column in the database
 * If you use relationship, you need to edit additionally.
 *  For example: Column :: make ('authorized_person.0.full_name')
 * ->name('authorized_person.full_name')
 * ->title('Authorized Person')
 * If your relationship data is Array, you must specify "name".
 * Otherwise, you will get a Database query error while searching.
 *
 * title: The name we want it to be written at the Top of the Table.
 */
Now let’s make arrangements in Controller. First of all, let’s make our View screen.
# CustomersController
...
use AppDataTablesCustomersDataTable;
...
public function list(CustomersDataTable $dataTable)
{
    return $dataTable->render('app.customer.list');
}
What you should pay attention to here is that we are calling the render function over the CustomerDataTable class that we add as a dependency instead of the return view () we normally use. In this way, the public/app/customer / list.blade.php said that should run. I add only the parts related to datatable into the blade. You arrange it according to your theme.
@extends('layouts.app')

@section('title', 'Müşteri Listele')

@section('content')
@yield(‘title’)
@endsection@push('stylesheet') rel="stylesheet" href="https://cdnjs.cloudflare.com/ajax/libs/twitter-bootstrap/4.5.2/css/bootstrap.css"> rel="stylesheet" href="https://cdn.datatables.net/1.10.22/css/dataTables.bootstrap4.min.css"> rel="stylesheet" href="https://cdn.datatables.net/buttons/1.0.3/css/buttons.dataTables.min.css"> @endpush @push('javascript') {!! $dataTable->scripts() !!} @endpush{!! $dataTable->table() !!} // The part that makes up our table {!! $dataTable->scripts() !!} // Required Js files
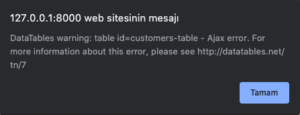
When we visit /customers/list via the browser, we will get an error like this.

The reason for this error is that it cannot access the route we set in ajax. Now we will edit that part. We come to the part where our job is simplest, we organize the library’s routes/web.php as follows.
.....
public function listForDatatable(
                 Request $request,
                CustomersDataTable $dataTable,
                ICustomersService $service
)
{
             if ($request->ajax()) {
                  return $dataTable->dataTable(
                     $service->listForDatatable()
                  );
             }
}
....
Now we are making arrangements in the business layer.
namespace AppExampleBusinessConcrete;

use AppExampleBusinessAbstractionICustomersService;
use AppExampleDataAccessAbstractionICustomersDataService;

class CustomersManager implements ICustomersService
{

    protected $dataService;
    public function __construct(ICustomersDataService $dataService)
    {
        $this->dataService = $dataService;
    }

    public function listForDatatable()
    {
        return $this->dataService->listForDatatable();
    }
}

We added the Data Layer to our system on the constructor method and moved it to a variable.
Thus, we will be able to access from within the function we want in the Business layer.
Next is to edit the Data layer.
namespace AppExampleDataAccessConcrete;


use AppDataTablesCustomersDataTable;
use AppExampleDataAccessAbstractionICustomersDataService;
use AppModelsCustomers;

class CustomersDataManager implements ICustomersDataService
{
    protected $model;
    protected $dataTable;
    public function __construct(CustomersDataTable $dataTable)
    {
        $this->model = new Customers();
        $this->dataTable = $dataTable;
    }

    public function listForDatatable()
    {
        return $this->dataTable->query( $this->model );
    }
}
/**
  $this->model = new Customers (); We are creating a new model instance. Also, we add our DataTable class here as a dependency and send the instance into the query class.
*/
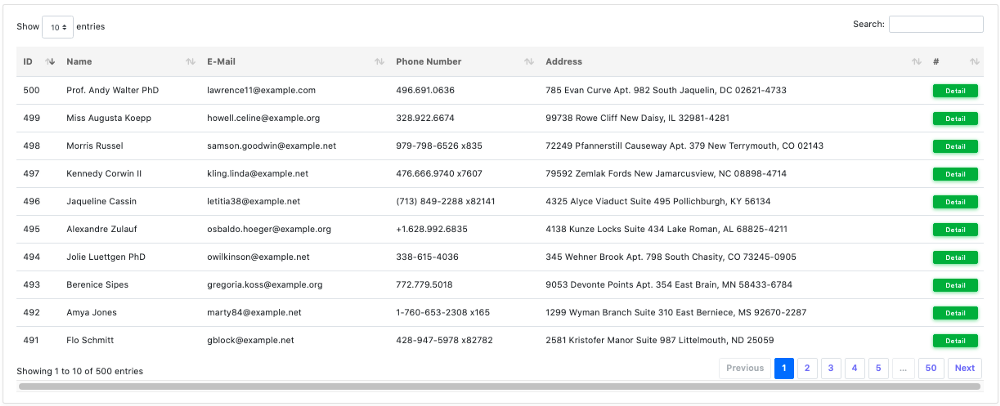
As you can see, adding a limit to the query for pagination and transmitting the page number completely saves us from writing expressions such as were like for the searched word, we just send it to our model library, it takes careof the rest 🙂 Let’s refresh our page and look at the result.
-
Target [App\Example\Business\Abstraction\ICustomersService] is not instantiable.
we got the error. The reason for this is that we did not specify which classes the interfaces we use in the Work and Data layers are dependent on. In that
php artisan make:provider Example
Then we define the provider to the system.
#config/app.php'providers' => [
...
    AppProvidersExample::class
];
and then we make connections to the provider part. For details, you can review the provider’s section from Laravel documentation.
# ExampleProvider public function register()
{

    $this->app->singleton('AppExampleBusinessAbstractionICustomersService','AppExampleBusinessConcreteCustomersManager');
    $this->app->singleton('AppExampleDataAccessAbstractionICustomersDataService', 'AppExampleDataAccessConcreteCustomersDataManager');

}
In this way, we delete the automatically created definitions and cache after they are linked together.
composer dump-autoload
php artisan optimize:clear
and Conclusion


Good and Error Free Coding for Everyone 🙂
You can access the codes of the project on Github.
https://github.com/tolgakarabulut/laravel-yajra-datatables-example


